A Beginners Guide to Pottery Illustration
The Kent Archaeological Society has been pleased to host Holly Evans, an undergraduate from the University of Reading, as a student archaeological illustrator working on the Ozengell Anglo-Saxon collection. As part of her portfolio work and following on from member feedback at the recent Archaeology Research Group (ARG) Fieldwork Forum, Holly has been working on a number of beginners guides to archaeological illustration.
The first two of these guides focus on the illustration of pottery sherds and whole pots, an area which members had raised as being one which they wanted training in.
In order to ensure that the guides are fit for purpose we are making them available on our website and circulated to affiliate groups for constructive feedback.
Please try to use the guide to draw pottery in your collection, both sherds and whole pots. Any comments on the guides or examples of your finished drawings (if you are happy for these to be published on our social media channels) should be sent to andy.ward@kentarchaeology.org.uk.
If these guides prove to be useful and well received Holly aims to create further guides covering other object illustrations. Suggestions for further guides should also be sent to andy.ward@kentarchaeology.org.uk.
Archaeological Illustration guide: complete pots
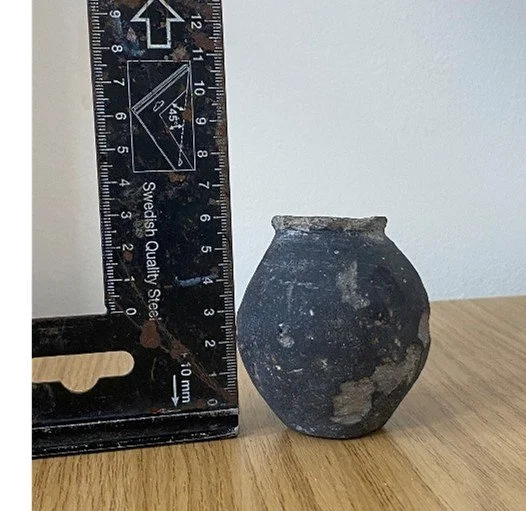
This guide will take you through the basics of drawing full (complete) pots for archaeological illustration. It covers the basic layout of a pot drawing, measuring, decoration, and some reconstruction. With clear instructions and examples, this guide is designed for people who are beginners to archaeological illustration, and should not be followed for professional use. Please note that my examples are not done perfectly, nor are they of a real pot, but rather to demonstrate the general method that you would use.
Equipment list:
Rulers and set squares
Callipers and a good quality profile gauge
Mechanical pencils (between 0.3mm and 1mm) or good quality regular pencils and a pencil sharpener
Fine nibbed black ink pens, sizes 0.1 to 0.5 are best
Tracing paper, or notebook if being done casually
Things to remember:
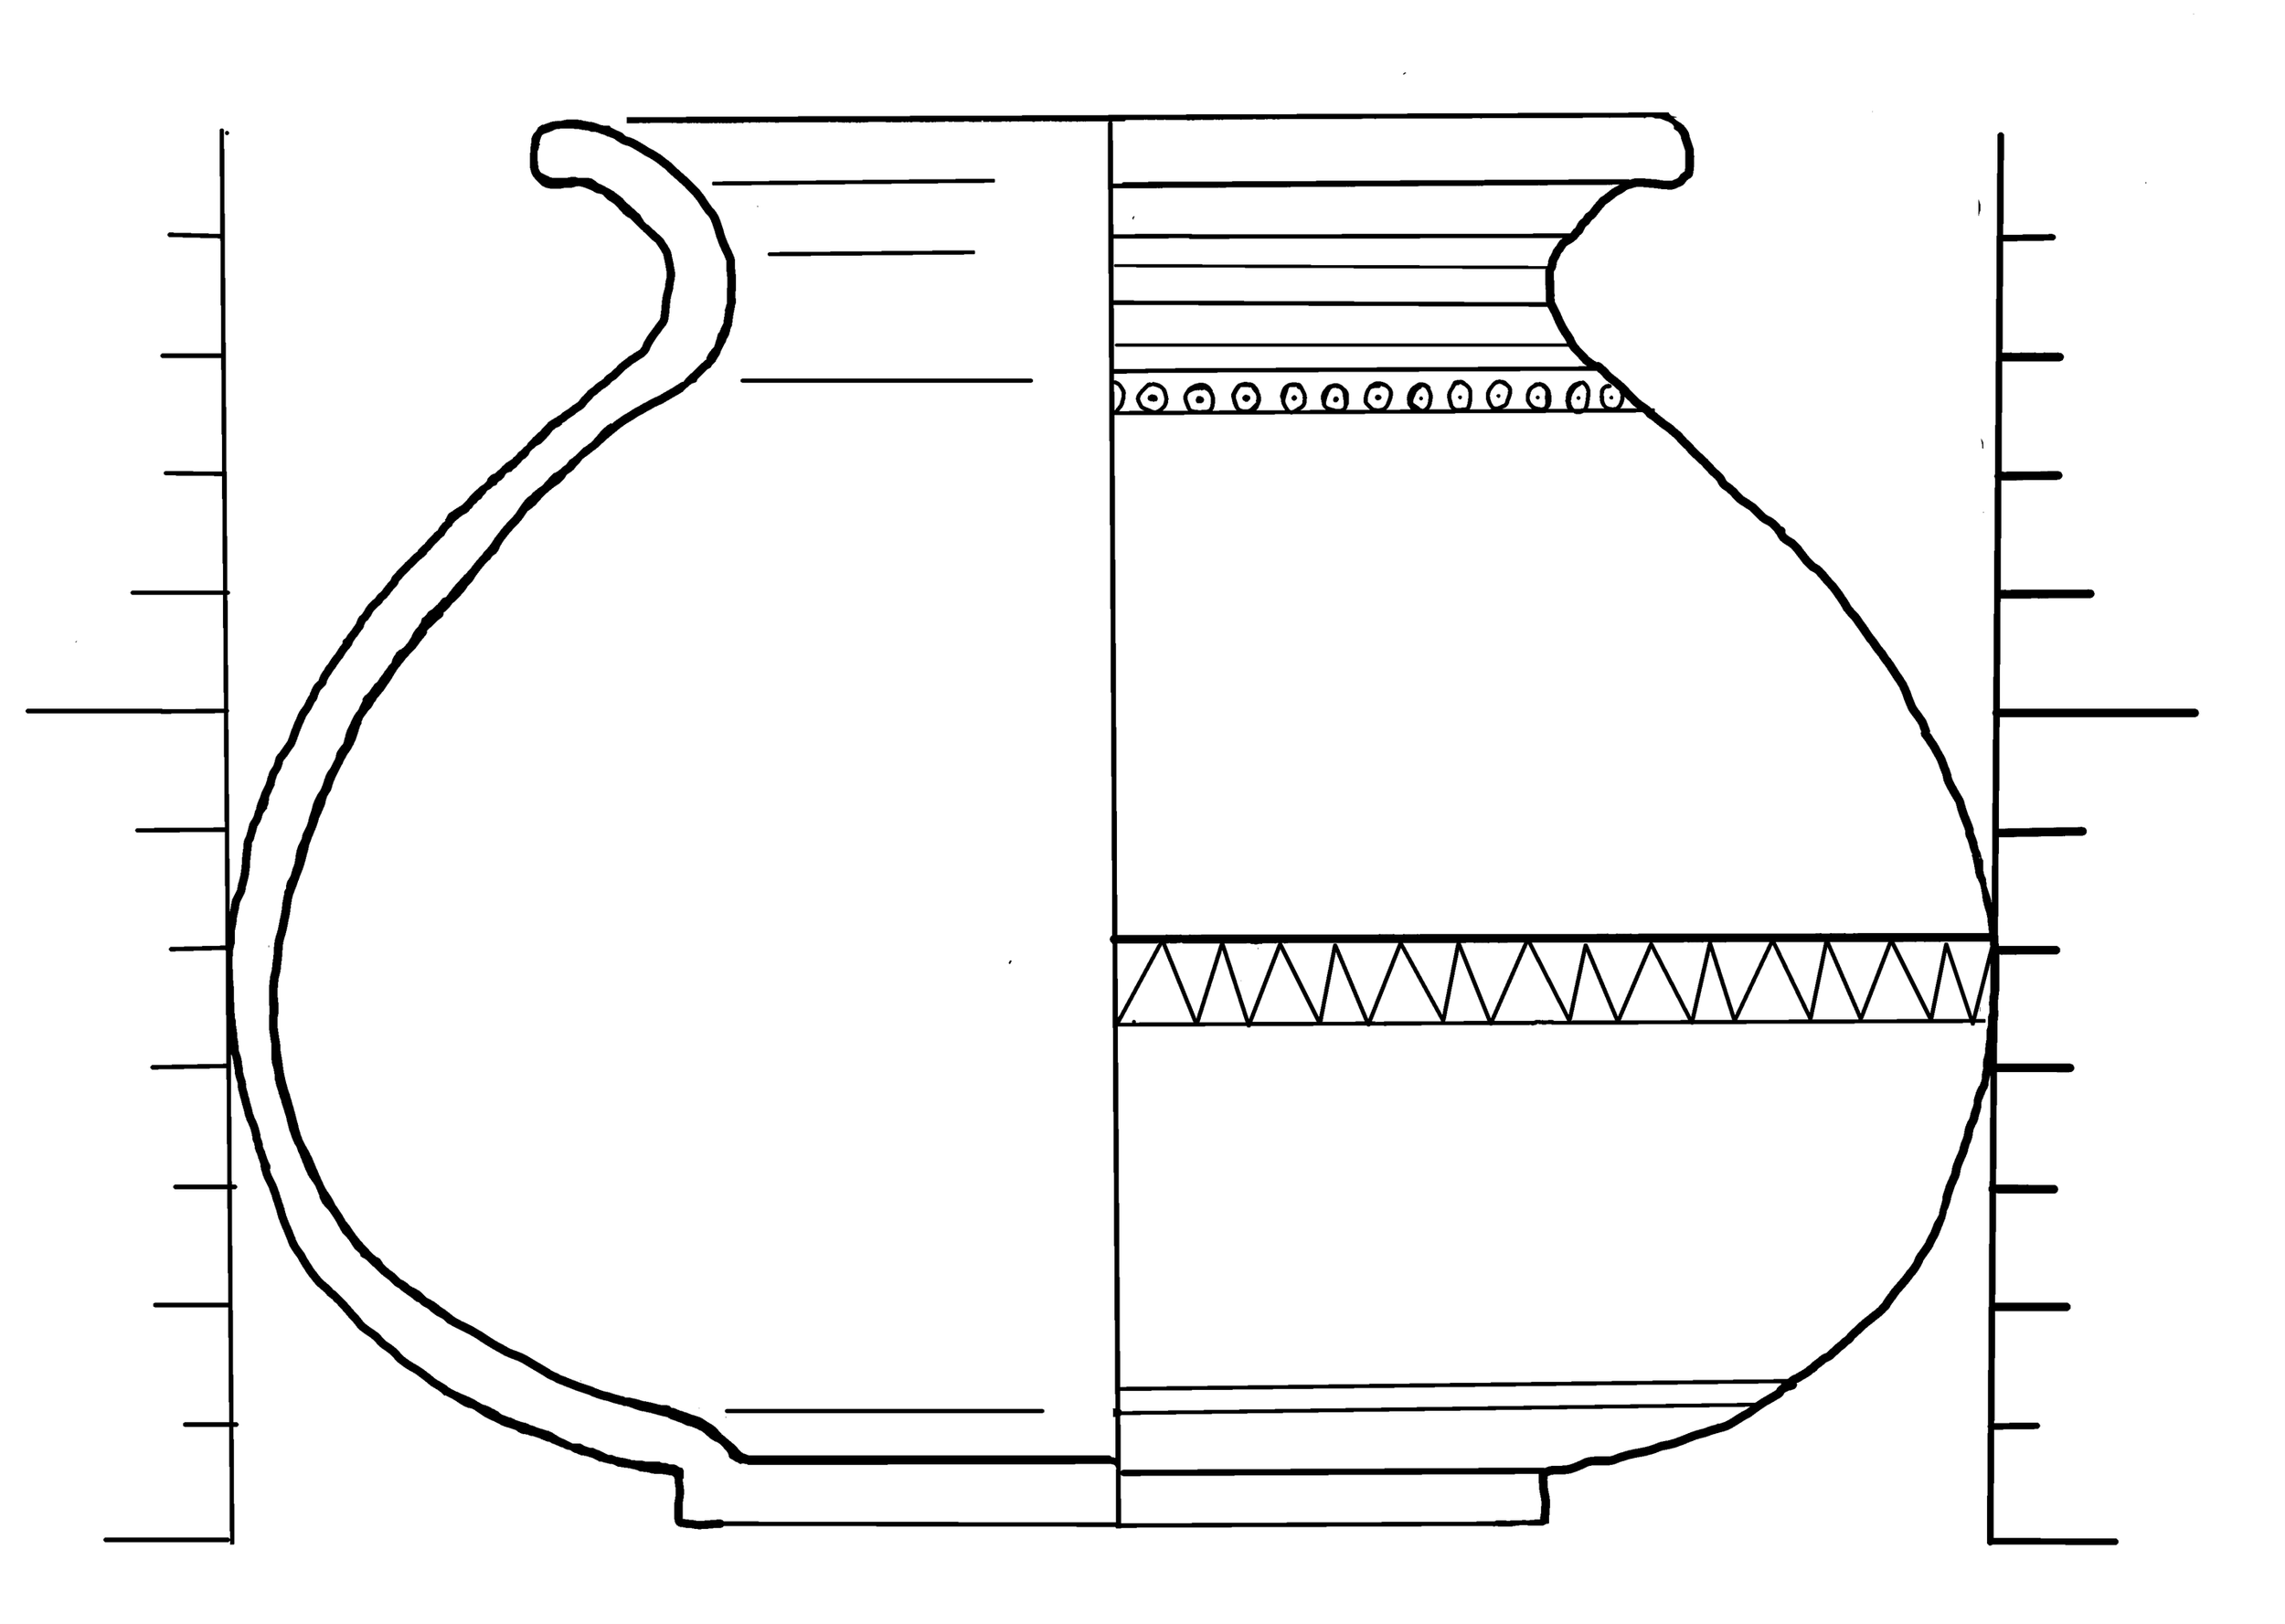
Pot drawings are normally done in a 1:1 scale and from a straight on perspective, with the right side showing the exterior and the left side showing the interior and section.
Measuring equipment often does not start at zero, pay attention to any extra space that you’ve included in your measurements
Once you have started drawing, it is important to not deviate from your chosen view of the pot. (Don’t draw the rim from one side and the decoration from another). If one part of your pot has more external details than the rest, it would be best to have that be the right hand side of your drawing.
The first thing to do is determine the basic measurements of your pot. You will want to find the height, the diameter of the rim, the diameter of the base, and the width at the widest part of the pot. These are easiest done with callipers, but rulers can also be used if you don’t have one. If your pot has some damage, it is important to find the most complete part of the pot to take your measurements. Plot these on your paper as straight lines, creating an open box for your drawing to go inside. It may be useful to lay a sheet of graph paper underneath your tracing paper, to ensure that your lines are straight.


Note that in this example I have added 1cm guidelines on the side to help me with the next step.
The next step is to draw the outside profile, or the outline, of the pot. If you have a profile gauge, this can be used now to get a general idea of the shape of the profile, but this should not be your only form of measurement. The best way to measure the profile is with a ruler and a set square/measuring block. Place your pot so that the widest part of the left side is touching the set square and measure the distance between the set square and the pot at 5mm – 1cm intervals, depending on the size of the pot. Plot these numbers on your paper and join them up to create the first line for your pot profile.


As you can see in the image above, the profile gauge does not give an accurate measurement but may be a useful place to start. You could use the profile gauge as a rough draft, and then alter your drawing by measuring more accurately.
Once your first profile line is done, you will want to copy it onto the other side of the pot. If you are using tracing paper, you can photocopy your drawing mirrored and use this to trace the line onto your original drawing. If you are not using tracing paper or don’t have access to a photocopier, you can just measure and plot the points again on the other side of the pot. Only do this if your pot is symmetrical, if there are slight deviations then just alter the drawing, if there are major deviations please see that section of this guide.

Next you want to add in the internal profile, or thickness, of the pot to the left hand side of your drawing. The internal profile can be quite difficult to measure when you have a complete pot, so you may have to estimate quite a lot of it. The thickness of the base can be done easily, depending on the size of the pot. You should already have the total height of the pot noted, so to find the thickness of the base, place a long ruler or measuring instrument into the pot until it touches the base, and find the difference between this measurement and your total height. You can also find the thickness of the rim easily with your callipers. With the measurements of the base and the rim, you can essentially just guess the thickness of the rest of the pot by looking at the shape and feeling it with your fingers.
In this photo, the pot was way too large for me to measure so I had to be creative. I measured a pencil that could fit inside the pot, then used this to find the inside diameter at the widest part of the pot. By subtracting this from the outside diameter, I can find the thickness for that part of the pot. This gives me a good starting point for the rest of my estimates.

Once you have drawn your inside profile, erase some of the top diameter line so that it is no longer touching the profile.

Decoration
Once the basic outline is complete, the next step is to add any decorative elements. External decoration should be illustrated on the right-hand side of the drawing, while internal decoration appears on the left-hand side. Thicker lines can be used to suggest depth or shadow, but avoid trying to create a three-dimensional effect.
When illustrating internal decoration, ensure it does not connect to the centre line or the internal profile of the vessel. For external decoration that continues around the entire circumference, draw the design as a continuous band where appropriate. Always remain consistent with the original viewing angle chosen at the beginning of the drawing and do not include details that would not be visible from that perspective.
Structural elements
If you have a pot that has some holes or is missing a section, and you know what should have been there, you can draw it as a reconstruction with dotted lines.
If there is one handle on a pot, it is best to show it on the right hand side as it is external. However, if there are handles on both sides, you can either draw it in the same way as the left profile, or you can draw it in with dotted lines to differentiate it from the inside of the pot. Any handles should also have a section next to it showing it from above. Spouts should also be shown on the right hand side.
Archaeological Illustration guide: Pottery sherds
Equipment list:
Rulers and set squares
Callipers and a good quality profile gauge
Mechanical pencils (between 0.3mm and 1mm) or good quality regular pencils and a pencil sharpener
Fine nibbed black ink pens, sizes 0.1 to 0.5 are best
Tracing paper, or notebook if being done casually
Pot drawings are normally done in a 1:1 scale and from a straight on perspective, with the right side showing the exterior and the left side showing the interior and section.
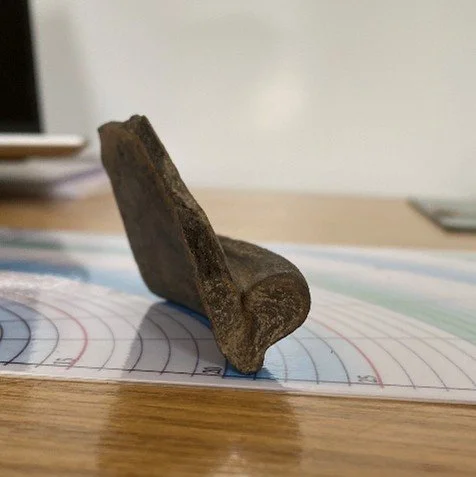
The first thing to do is determine the diameter and height of your pot. If drawing a pottery sherd, a rim diameter chart will be useful in finding the diameter of the whole pot, but possibly not necessary for experienced pottery specialists. Place the sherd upside down and flat on the table in a way that has as much of the rim touching the paper as possible. Then go down the rim chart until you find where the curve of the rim matches the curves on the chart. The number on the chart which best matches your sherd will correspond with the full diameter of your pot. In this example the diameter of the pot is 8cm. Try to note down the measurements you take as you go, so that you can check your work later. If your rim diameter chart has percentage lines on it, use that to determine how much of the full pot you have.


To find the height, keep your sherd in the same position on the table and use either a ruler/set square or callipers to measure it. If using a ruler, remember to account for the size of any unmarked part of the ruler to make sure your measurements are as accurate as possible.


Once the diameter and height have been found, use a pencil to draw them as 2 straight lines, with the height in the middle. Leave space on the paper as, depending on the type of pot, your drawing may extend past the diameter line.
Example:
There are a few different ways to measure the profile of a sherd, and you may have to use multiple methods to ensure an accurate drawing. If your sherd is in good condition, you can trace around the profile to get a starting shape, but this should be followed up with precise measurements. You may also use a profile gauge, but this should be of good quality with fine metal teeth, and not to be used on fragile pottery.

The most accurate way to measure the curve of the pot is to place your set square next to the upside-down sherd, touching the outermost point. Then measure the distance from the sherd to the set square at intervals of around 10mm and any obvious changes in angle. Drawing a line directly upwards from the widest part of the pot can be helpful. Plot your points on the left side of your drawing and then join them up. As the sherd will be upside down, measuring at regular intervals will prevent any confusion when plotting the points (though you could draw it upside down if you wanted to). Again remember that many measuring tools do not start at zero, as seen on this picture, so pay attention to where you are plotting points.

Example:
Next measure the thickness of the sherd at similar intervals. This can be done by measuring the distance from the inside of the pot to the outside with callipers, or you can measure the distance from the inside to your line indicating the widest part of the pot. It is important to consider the condition of the sherd, as the thickness may differ in places due to damage. Plot these next to the external line and connect them at the top, creating a full section view of the sherd. Your drawing should look as if someone has cut through the pot. At this point you should erase some of the diameter line on the left side, to about 1 cm away from the internal line. Do not join up the lines at the bottom of the drawing unless your sherd also has the base of the pot.

Example:
If you have access to a printer, photocopy this drawing flipped and trace the external profile onto the right hand side. If not just use another piece of tracing paper for this, or remeasure the points of the external line. The diameter line should meet the new profile line at the highest point of the pot or sherd.

Example:
External details are shown on the right hand side, and internal details on the left hand side. Thickness of the lines can be used to show depth of detail. Ridge lines on the right hand side should connect to the profile line, but not on the left side.

Example:
Once the pencil drawing is complete, photocopy it and place a new sheet of tracing paper on top. Trace over the lines carefully with a thin ink pen. If drawing in a notebook, you could go over your pencil drawings with the pen, ending with only one drawing instead of two.